Digital Anatomist Interactive Atlas
User Manual
Please be sure to check the
FAQ
list before submitting
any questions..
Index
-
Overview
-
System Requirements
-
Browse Mode
-
Toolbar (aka: NAVBAR)
-
"Show All Outlines" Button
-
"Start Quiz" Button
-
"Label All" Button
-
"Retrieve URL for This Page" Button
-
Build URL for Custom Pin Diagram" Button
-
Copyright Buttons
-
Quiz Mode
-
"End Quiz" Button
-
"Show Answer" Button
-
Customizations (for programmers only)
Overview
The Digital Anatomist Interactive Atlas is a system that allows
the user to interact with annotated images stored on a central server machine.
Image sets are divided into Atlases. For example, one site may have
atlases on neuroanatomy, thorax anatomy, and knee anatomy, while another
site may have a radiology atlas and a pathology atlas. An atlas is made
up of sets of images that are structurally annotated. This means that each
images has structure boundry outlines on top of it, that each have a different
meaning. An atlas may also contain QuickTime movies that can be linked
to from the structures. In general, we say that an atlas is made up of
frames.
A frame is contained within a page in your web browser. Every frame has
an image associated with it, as well as the structural annotations. Each
frame also has a certain number of interface buttons underneath the image.
These buttons provide a number of different services, described in later
sections of this manual. There are two basic kinds of frames, content
frames and control frames. A content frame is one with an image
of interest where structures of interest are named. A control frame is
a one with a menu-like image, where structures outlining button-like areas
of the image provide a means of navigation as links to other frames.
The heirarchy of frames usually results in a tree-like formation:
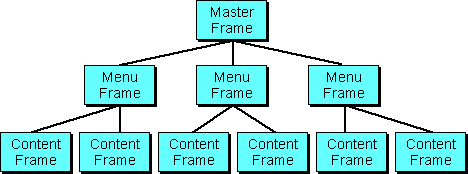
The Digital Anatomist Interactive Atlas also provides other ways
to navigate through this tree of frames, which will be discussed later
in the documentation.
System Requirements
To use the Digital Anatomist Interactive Atlas, you must have a
graphical World-Wide Web browser, and a connection to the Internet. It
does not matter which kind of computer or browser you use, as long as it
can handle inlined GIF images, and adheres to the NCSA FORM POSTing standards
(See below for list of incompatible systems). You
will also get more use out of some of the atlases that incorporate animations,
if your system handles QuickTime movies, either internally, or with the
assistance of a helper application. The speed of your Net connection should
not matter either, but keep in mind that you will be transfering large
images, and users connected through 14.4K modems and slower often find
the delay time too great.
Incompatible Systems
There are a number of brands of web browser that we have found to be incompatible
with the Digital Anatomist Interactive Atlas. They do not work primarily
because they do not fully comply with the NCSA FORM POSTing standards.
Some of the browsers we have found problems with are:
-
AOL browser (with many things)
-
Spry Mosaic (with some things)
-
OmniWeb (with some things)
Browse Mode
Browse Mode is the default mode for the Digital Anatomist Interactive
Atlas. This mode allows the user to "browse" through an image and it's
annotations with a point-and-click interface. There are three major parts
to a frame in browse mode: the stucture label at the top, the image in
the middle, and the interface buttons at the bottom. Clicking within the
boundaries of the image will activate the structure that the mouse click
lies within. If the structural outlines overlap, and a mouse click lies
in more than one structure, the topmost structure, as defined by the server
representation of the frame, will be activated. If the structure clicked
is a named structure, the frame will be refreshed, and the structure
label at the top will be changed to display the name of the structure clicked.
If the mouse click was within a
control structure, the web browser
will refresh with the new frame linked to by the control command for that
structure. This is the main form of navigation through an atlas. If the
structure being activated is a movie structure, the browser will
download the QuickTime movie specified by the frame, and will play it according
to the browser configuration. If the mouse click lands in area that is
not enclosed by any defined structure outline, the atlas will behave as
if a named structure had been clicked, with the name unlabelled area.
Toolbar (aka: NAVBAR)
The NAVBAR provides the alternate method of navigation through the
frame heirarchy of an atlas, as well as links to a few other features.
Clicking in the NAVBAR will refresh the web page, and most likely lead
you to another frame or page.
 The Arrow Buttons
The UP arrow will take you to the parent frame, in the frame tree (usually
a control frame), of the frame you are currently viewing. If there is no
parent frame, you will stay on the same frame.
The RIGHT arrow will take you to the next sibling frame of the current
one. The next sibling is the one linked to by the next button after the
one that links you to where you are on the parent frame. If a next sibling
does not exist, you will stay on the same frame.
The LEFT arrow works like the RIGHT arrow, but it takes you to the previous
sibling frame.
The TOP arrow (the one pointing to the 'ceiling') takes you back to
the topmost page, the one that let you chose which atlas to use. This may
be different for each atlas server, but we recommend that the administrators
point it to our page of atlases, in hope to accumulate links to everybody's
atlases across the net all in one place.
 The Home Button
The HOME button (the one that look like a house) takes you to the 'home
frame' of the atlas you are currently in. This is usually the top
level control frame within the current atlas, and is set by the atlas author.
 Table of Contents Button
The TOC button takes you from browse mode to TOC mode.
 Help Button
The HELP button takes you to this help page. That is probably how you got
here.
The "Show All Outlines" Button
The "Show All Outlines" button allows the user to specify whether or not
all the boundries of the frame's structures will be highlighted while in
browse mode or quiz mode. If outlines are on the button changes to "Hide
All Outlines" in order to turn them off.
The "Start Quiz" Button
If you are on a frame that has at least one named structure on it, then,
in browse mode, you will see a button labelled Start Quiz. Clicking
this button places you in Quiz Mode for
this frame. If there are no named structures on the current frame, this
button will not appear.
The "Label All" Button
If you are on a frame that has at least one named structure on it, then,
in browse mode, you will see a button called Label All. Clicking
this button will retrieve the Pin Diagram for this frame. The Pin
Diagram is an image made up of the current frame's image with lablels for
each named structure dynamically drawn on top. A small dot or "pin" will
be placed in the center of each structure and will be connected to the
corresponding structure label by a thin line. If the "Show All Outlines"
button was checked when the "Pin Diagram" button was pressed, then the
Pin Diagram image will have the structure outline highlighted as well.
The PIn Diagram is just an image. If you are using a browser that can display
GIF images, then this image will appear on a new page, and all you need
to do to go back to the atlas page you came from is hit the "Back to Atlas"
button. If your web browser cannot display GIFs, it will need a helper
application to do so.
NOTE: Since the Pin Diagram image is generated
dynamically, it may take a little while to generate, so please be patient.
The "Retrieve URL for this Page" Button
Because each atlas page is generated through a FORMs POSTing, you cannot
simply add the URL displayed at the top of your browser to your hotlist.
To see the correct URL for the current frame page, you must click on the
button labelled "Retrieve URL for This Page". Doing so will bring up a
new web page that displays the correct URL for the current frame page.
This button works for both Browse Mode and Quiz Mode.
The "Build URL for Custom Pin Diagram" Button
This button takes you to a new form that allows you to build a URL that
will generate a custom pin diagram for the current atlas frame. This pin
diagram will show only those structures you request, can outline the structures,
and can have numbers appear instead of labels. The numbers are useful if
you are generating an on-line quiz that is to be part of another tutorial.
When this form appears you should select at least one of: "Show structure
outlines" to have the outlines of all selected structures displayed, or
"Show structure pin and label" to have a line drawn from the label to the
center of the structure.
Given these two basic operations you can select "Label with number instead
of structure name" , and can set the image size for smaller browsers.
The structures that appear in the frame are listed in the list on the
lower left. Select "All" (the default) to show all structures. Deselect
"All" and select any number of other structures to show only those structures.
Alternatively, check "Use matching strings", to select terms that either
exactly match a "Match string" that you type, or contain that string as
a substring.
When you have made your selections click "Generate URL". Then on the
newly generated page, click "Go there now" to see the result.
The Copyright Buttons
At the very bottom of each page there are two hypertext links that have
to do with copyrights. The software copyright link will always be the same,
and will link to a page about the copyrights for the Digital Anatomist
Interactive Atlas software. The other link will be different for each
atlas server, and will link to the copyright message for each individual
atlas.
Quiz Mode
Quiz Mode uses the same frames as Browse Mode, but can only be run
on frames that contain at least one named structure. Quiz Mode is started
by pressing the "Start Quiz" button from Browse Mode. In this mode, instead
of displaying the name of the structure the user just clicked on, the computer
prompts the user to click on a certain named structure, which the user
must find on his own. The top of the frame will read: "Please click on:"
followed by the name of a structure on that frame. The user must then attempt
to locate and click on the structure with that name. If the user guesses
correctly, the next page will display a small message indicating the last
answer given was correct, and will then be prompted for a new structure
to click on. If the user's guess was incorrect, the next page will display
a small message indicating that the last guess was incorrect, the name
of the structure he actually clicked on, and then prompt him again, to
click on the same structure. This will continue until the user answers
correctly. The quiz will continue until all structure have been asked and
answered correctly. The user's score, as both a fraction and a percentage,
wil be displayed near the bottom of the page. As in Browse Mode, the structural
outlines may be turned on and off with the "Show All Outlines" checkbox.
The "End Quiz" Button
Every structure will be asked until you get it correct, and then never
again for the remainder of the quiz. Once all structures have been answered
correctly, quiz mode automatically ends and you are returned to Browse
Mode with a message noting your final score. If you wish to terminate the
quiz before that, simply click on the "End Quiz" button. This will return
you to Browse Mode, but you will not get any additional messages displaying
your score.
The "Show Answer" Button
In the case that you are unable to guess the correct answer, you have the
option of clicking the "Show Answer" button. Doing so may take a few seconds
because of the nature of the computaion requested, but it will return the
same image, with ONLY the outlines of the structures with the same name
as the structure being asked drawn on. You will continue to be asked to
click on that structure until you do so. If you guess incorrectly, it will
go back to either all or no outlines (depending upon the checkbox) and
will not advance until the correct answer has been given. Clicking the
"Show Answer" button does not make any change to your score.
TOC Mode
TOC Mode (Table of Contents) can be started by clicking on the "TOC
Button" from Browse Mode. In this mode, you will see an expandable and
contractable indented heirarchy representation of the frame tree. Next
to each frame name is an arrow icon. If the arrow is pointing to the right,
this means that the frame subtree below that frame is closed, and not displayed
on the screen. If the arrow is pointing down, the frame subtree below that
frame is open, and displayed on the screen. If there is no arrow next to
a frame name, it is a leaf, and does not have any children in the frame
tree. Clicking on open arrow will close that subtree, and clicking on a
closed arrow will open that subtree. Clicking on a frame name link will
take you directly to that frame in the atlas. There also two buttons at
the top of the page. The "Expand" button will open all frame subtrees.
The "Contract" button will close them all.
Creating a search engine (for programmers only)
This section describes one way to permit custom access to the Digital Anatomist
atlases. By understanding these directions a programmer can create an index
of all outlined structures in a given atlas, store this index in a database,
then write a cgi program to search for terms, display atlas pages that
show the terms, and outline the terms on the image (like the Create Custom
URL above). If you create such a search engine please let us know
so we can link to it.
To create a list of terms enter the following URL:
http:<server>/cgi-bin/DA/termlister?<atlas>
For example, for the Test atlas on the main Digital Anatomist web site:
http://www9.biostr.washington.edu/cgi-bin/DA/termlister?Test
This will generate text output on the web browser of the form:
<term><tab><frame_file_path><tab><atlas><tab><id>
where,
term is the name of a structure,
tab is ASCII tab
frame_file_path is the directory path to the annotations
(or frame) file for the image
atlas is the name of the atlas (e.g. Test or Neuroanatomy)
id is a unique id for the region of interest depicting
the structure in the frame file (a structure may be depicted by more than
one region)
For example, the following is the first four lines of output for
the above URL that lists the terms in the Test atlas:
dentate (lateral) nucleus Index/Cerebellum
Plus Test 53
dentate (lateral) nucleus Index/Cerebellum
Plus Test 52
fastigial (medial) nuclei Index/Cerebellum
Plus Test 51
interpositus (intermediate) nuclei Index/Cerebellum
Plus Test 50
interpositus (intermediate) nuclei Index/Cerebellum
Plus Test 49
Current atlas names on the www9 site are: Test, Neuroanatomy,
NeuroSyllabus, Thorax, and Knee. Any of these can be substiituted
for <atlas> in the above URL.
This output can be saved in a text file, then parsed and imported to
table in a database, where the columns are the same as given by the
output of termlister: term, frame_file_path, atlas, id.
A search engine can then be constructed to retrieve rows whose first
column matches a search term. A URL to generate a Web page showing the
term can then be constructed as follows:
http://<server>/cgi-bin/DA/drawStuff?<atlas>+<frame_file_path^>+-oli_<id>
where <frame_file_path^> is <frame_file_path with all spaces replaced
by ^
For example, given the first row of the above output:
http://www9.biostr.washington.edu/cgi-bin/DA/drawStuff?Test+Index/Cerebellum^Plus+-oli+53
This will generate an image from the frame entitled, "Cerebellum
Plus", with the dentate (lateral) nucleus outlined and labeled. If you
don't want the outline leave out the "o" in "-oli". If you don't want the
label, leave out the "l" (but you need to specify either o or l). If you
want numbers instead of names attached to the label, add an "n", e.g. "-olin".
You can also create a URL to simply go to the atlas page where the structure
occurs, without outlining any structure. An example URL for this would
be:
http://server>/cgi-bin/DA/PageMaster?atlas:<atlas>+ffpath<frame_file_path^>+2,
or, for the first row in the above output:
http://www9.biostr.washington.edu/cgi-bin/DA/PageMaster?atlas:Test+ffpathIndex/Cerebellum^Plus+2
Last Updated: 30 May 2001
digital_anatomist@biostr.washington.edu